Hey Guys, Tobie (Tobu) here,
So, today we’re going to paint a Panther! This particular
Panther is a very pretty one courtesy of JTFM Enterprises or Die Waffenkammer
(http://www.diewaffenkammer.com). The model was fantastic to work with and I highly
recommend the JTFM wares.
My inspiration for the paint scheme
The colours for this project where based on (stolen from) Vallejo’s
new AFV painting system. Specifically the German
Dark Yellow set (http://www.acrylicosvallejo.com/en_US/afv-dunkelgelb/family/17/116). I already owned all of the colours bar the primer so did not get the set
itself, but if you wanted to follow along with this guide it would be a handy
way to arm yourself with most of the necessary paints. So after a trip to my
FLGS I was with the suitable primer and was ready to gird my loins and get to
work.
Most of the painting herein was done with an airbrush. You
could have a crack at doing it by hand, but it would be very difficult and
time-consuming to replicate the soft blending effect you get when using an
airbrush. However, I imagine using the same colours in progressively lighter
drybrush stages could yield good results for the airbush-less amongst you.
The method I have tried to replicate is one pioneered by the
scale model world and is known as ‘Colour Modulation’. I’m not going to go
through the details of this method here as you’ll get an idea from this
article, some people may already be familiar with it, and as always – Google is
your friend.
On to the painting!
Step 1: Cleaning
Ok no painting yet – slow down there hombre. JTFM recommend
cleaning their resin models with warm, soapy water to remove any mould release
agent – which can cause problems if you paint over it later. I had a big slab
of paint chip off another resin model (not from JTFM) when I forgot this step
in the past, so I have become a bit paranoid and now all of my resin and metal
models get a bath before assembly. I use standard dishwashing liquid. Allow the
model to dry thoroughly (overnight) on paper towel before continuing.
Clean as a whistle!
Step 2: Drilling
This stage is optional and comes down to personal taste –
drilling gun barrels. I usually don’t bother I’ll be honest, but the muzzle thingy
on the end of the Panther’s gun was too badass for me not to in this
instance.
*Insert 'Holy ____ Batman' Joke*
Step 3: Priming I
JTFM also recommend priming their products with a specialist
plastic primer. I went to my local hardware store armed with information from a
fellow friendly gamer (thanks Patch!) and picked up a clear enamel plastic
primer which is for protecting plastic furniture etc.
I didn’t take a photo of
this stage as it’s almost impossible to tell the difference (as the primer
dried clear) – however this stuff was not designed for models so I just gave it
a very fine ‘misting’. Apparently colour enamel-based model primers are also suitable
for this priming stage.
Step 3: Priming II
Holy Colour Primer Batman! Prime the entire model, except the tracks
(remember they’re primed but it’s clear) with acrylic Vallejo German Dark
Yellow Primer (604). I smashed this shit straight in the airbrush with no
thinner (apparently they’re designed for this) and it was all good. I kept the
model disassembled to make sure I could hit all the areas I wanted.
This was
probably the most time-consuming stage as I needed good, even coverage. The
airbrush sprays thin layers of paint so it does take a little while to build up
sexy, solid basecoats, but I guarantee after 4 or 5 coats are on there you will
be very aroused.
You're barring up right now aren't you?
YOU FILTHY BASTARD
The skirting and all of the bobbins where blu-tacked to a
wooden thing so they wouldn’t obscure any parts of the tank.
Step 4: Tracks
I painted the tracks German Dark Brown (70.822) by hand.
This stage could have been done after the highlight in hindsight, but I was
toying with the idea of assembling the tank after the pieces were primed which
would have made painting the tracks difficult. I ended up not doing this and
keeping everything separate as this allowed greater freedom with the airbrush
and saved me from having to resort to masking tape.
Step 5: Highlight I –
The Phantom Highlight
Now we’re on to the fun part! The first highlight was done with
Model Air Dark Yellow (70.025). As with the primer, the Model Air range is
designed for airbrushes so not much (or sometimes any) dilution is required. I
mixed this colour 3:1 with water and it sprayed nicely.
This is where you start to build up a nice gradient effect.
For this first step you want to hit every part of the tank that is not
recessed. This will leave the majority of the tank coloured with Dark Yellow,
with the darker primer remaining in the recesses providing shading. More
shading will be added in the weathering stages.
Step 6: Highlight II –
Attack of the Highlight
The second highlight in the delicious highlighting process
used Model Air Sand Yellow (70.028). When applying this stage think about where
you want the highlights to be. On some areas, such as the front Glacis plate
and the sloped areas of the turret the position of the highlights is reasonably
obvious.
Things get more complex when you think about the sides and
top of the vehicle. The Colour Modulation method uses a Zenithal light-source
where the light is directly above the model shining down. However, you don’t
typically see vehicles painted in this way – at least in the gaming scene
(scale modelers are a different, and uniquely terrifying breed). 40K vehicles,
for example, seem to be usually painted in the ‘GW style’ (massive generalisation)using
blocks of colour, with recesses shaded and line highlighting on the edges of
all the panels, with no real heed paid to the direction of the light source.
This is probably because painting blended colours, lightening as they get
closer to the light-source is hard on big, flat surfaces without an airbrush. And also because even with an airbrush it is
frakking hard! And also because when done well the ‘GW style’ looks rad-balls
too.

I wanted to try this new (for me) technique though, and I
struggled a lot with this, my first frolic into Colour Modulation. It’s not
really a matter of struggling with technique either – I don’t think this is a
particularly advanced application of the airbrush. It’s all about learning
where to put the highlights. I don’t have all that many pointers in this regard
as I did most of it by trial and error – have the last colour on standby to
cover up mistakes! I also take back what I said earlier, this was definitely
the most time-consuming stage of the painting.
I will say the most useful technique I found for finding
those highlights is to shine a lamp on the model and take photos. Chuck those
photos up on a screen next to you while you paint and look at what the light
hits – then in turn hit that area with your paint. I definitely learned I need
to practice more to build up intuition for where those highlights go.
Anyway, after much time and cursing, you will be left with:
Not perfect, but it will do!
I didn’t really conform to the colour modulation shit with
the side skirts as it looked weird when I did the first one. Trial and error I
say!
Step 7: Highlight III
– Revenge of the Highlight
The next highlight uses Model Colour Pale Sand (70.837).
Unlike the other paints so far, this is not from the Model Air range and so I
diluted the paint 1:3 with water and added a tiny amount of Liquitex Matte
Medium (http://www.liquitex.com/mattemedium/).
Liquitex Matte Medium is the nectar of the Gods and I would drink it if I could
– but that is for another article.
This stage is a lot easier as you have already decided where
the highlights are going. Simply go over them again, ensuring not to cover them
completely in a continuation of the gushing graduating.
Look at all that graduationating and shit
Step 8: Highlight IV –
A New Highlight (& assembly)
For the final (subtle) highlight I mixed a drop (exact
measurement) of GW Skull White into my airbrush cup which still had Highlight
III loaded and mixed it all up. I then sprayed a very fine amount onto the
utmost areas and onto little parts I wanted to draw attention to.
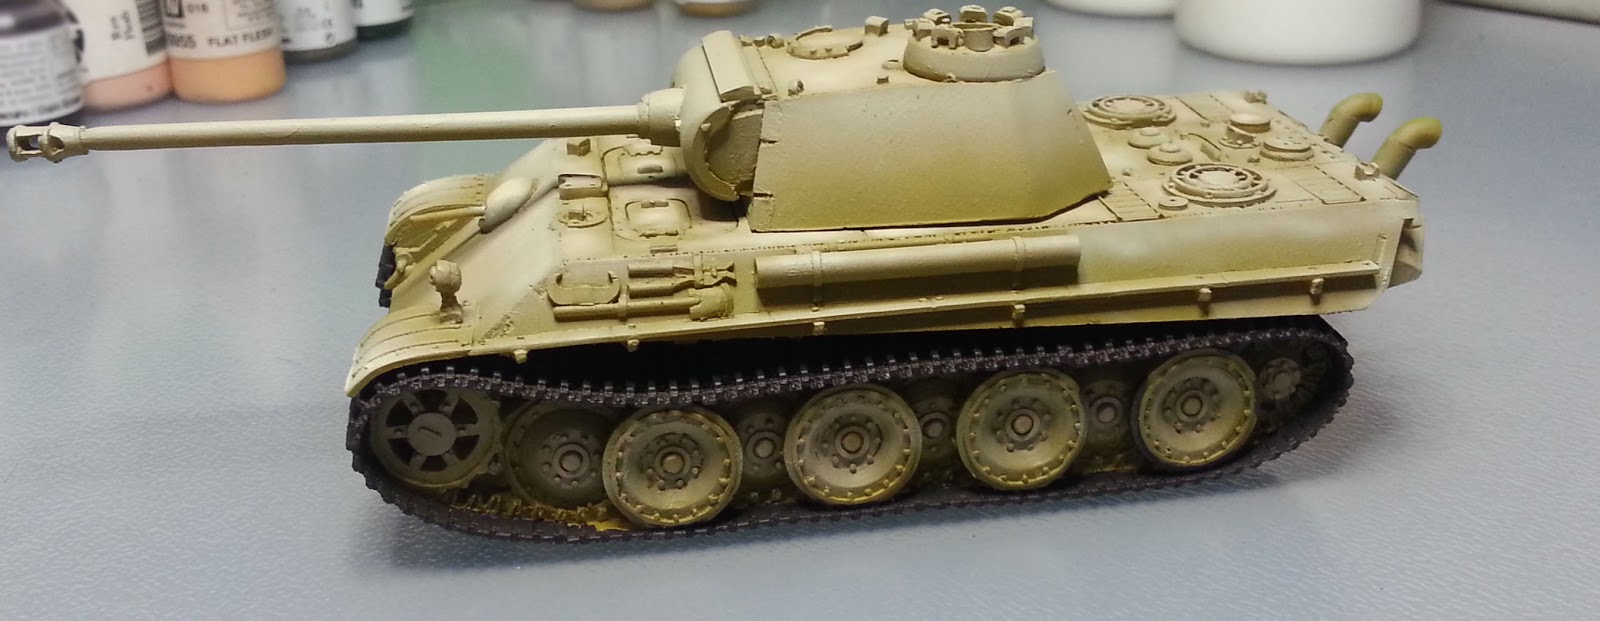
After this the model was assembled (sans side skirts):
Step 9: Weathering I
For weathering I made a very thin glaze of 1:8 Devlan Mud
and Water. I applied this to the whole tank. Be sure not to just slap this on
as it will pool and look shite. Load your brush with glaze, wipe your brush on
paper towel and then apply in a very thin layer. It should be thin enough that
you can see the glaze dry almost as soon as it is applied. This is somewhat
time-consuming and the effect is subtle but when viewed in the flesh it is
nice.
Once you have covered the entire tank a couple of times with
the above method, begin doing the same, but building the glaze up in recessed
areas to enhance the shading. You can make rain/dirt marks by building up 7-8
layers too. As the thin glazes dry so quickly, this doesn’t take long.
And now it’s pigment time!
Step 10: Weathering
II and final touches
I mixed up a combination of Vallejo Pigments 50:50 Natural
Umber and Light Sienna with enough Vallejo Pigment glaze to make a paste with
slightly-thicker-than-PVA sort of consistency. This was applied to the tracks
and splashed around other areas a bit too. I added a selection of small
scratches with Vallejo Dark Grey (70.818) and my finest brush.
I drilled some holes in totally historically-accurate
locations and attached guitar string for the antennae. Prime the metal string
before painting as per other Metal parts below.
The Man in the tank was painted German Dark Brown, washed
with GW Badab Black and the highlighted with GDB, then GDB with some GW Skull
White. I can’t remember the recipe for the skin, I’m sorry but presumably it
was done in a skin-like fashion.
Metal parts were painted with Vallejo Dark Grey (70.166), washed with GW Badab Black and the
highlighted with Dark Grey mixed with a little GW Skull White. I added some
average-looking rust to the the exhaust with Vallejo Cavalry Brown (70.818).
Wooden parts were painted P3 Bootstrap Leather and then
washed with GW Devlan Mud.
Decals where then applied and after they were dry I put a
couple of thin layers of the glaze from Step 9 over the top. I don’t think I
would do this decal glaze again as it made the edges of the decals stand out a
little bit – but meh whatever.
Done!
Step 11: Get on it
The pigments take a while (24 hours or so) to dry so go to
the pub and get the darkest beer they have in their largest receptacle, drink
it and then get another – You’ve earned it (kind of).
Fuck yeah
Final Photos
Outside in the good light:
Thanks everyone for reading and I hope at least portions of
this were of some use to you!
Tobu out.